This chapter follows one turn of the weekly loop, from running the tests to closing the fixed clashes. The Navisworks steps use the GBIM tab in Navisworks Manage; the Revit steps use the GBIM tab in Revit.
Before the first run
Good clash results start with good tests. These are common practice in Navisworks Clash Detective, and the GBIM tools work best with them:
- One test per pair of disciplines, named by the pair (for example STR Floors vs DRN Pipes), never one "everything against everything" test. Clash Report uses each side of "vs" to label the parties.
- Hard tests with a small tolerance (0–5 mm) for physical overlaps; clearance tests for insulation and access zones (typically 25–50 mm, more around equipment that needs maintenance space).
- Search sets per discipline and category (and per level or zone for focused re-checks), so the tests stay the same from week to week.
- Revit element IDs in the model. Export NWC files from Revit with element properties on, so every item carries its Element ID. GBIM reads it from Element ID ▸ Value, Element ▸ Id, a "Name [id]" or the UniqueId.
- A grid in the federated model (from the structural model), so Clash Map can name zones by level and grid bay. Without a grid it uses 10 m squares.
What each status means
| Status | Meaning | Who sets it |
|---|---|---|
| New | Found by the latest run; not looked at yet. | Navisworks |
| Active | A real issue, given to the party who must fix it. | Coordinator |
| Reviewed | Seen and discussed; waiting for a design decision or information. | Coordinator, from the party's comment |
| Approved | Accepted as it is (for example, a pipe through a sleeve that is allowed). GBIM writes Approved By and the time. | Coordinator |
| Resolved | Gone in the updated model at the next run. | Navisworks |
Close a clash only when it has gone from the same test in the next run. A clash that disappears because a test was renamed, an element was hidden or the tolerance changed is not fixed.
1 · Run the tests
- Update the federated model with this week's NWC files from every party.
- Run all tests in Clash Detective. New clashes come in as New; clashes no longer found become Resolved.
- Group clashes where one fix solves many (one duct crossing a row of beams is one task, not twenty).
2 · Find the hot zones (Clash Map)
Clash Map shows where the problems are before you read a single row. Every open clash of every test is placed in a zone, a level and a grid bay such as L02 / C-D / 4-5, and each zone is drawn in the model as one bulb.
- GBIM ▸ Clash Management ▸ Clash Map ▸ Build map. Open clashes only (New, Active, Reviewed) by default.
- Read the colours. Zones are split into red, yellow and green at the natural breaks of their clash counts (no thresholds to set); busier zones get bigger bulbs. The window states the breaks it found.
- Open a zone. Click its bulb in the view, or double-click it in the list. The model and the other zones dim; the zone's clashes show as small dark bulbs.
- Go to each clash. Click a small bulb or a row: the view goes to the clash and both items are selected. Clashes you have looked at turn grey.
- Save viewpoints. Choose rows (Ctrl / Shift) and click Save viewpoints: one viewpoint per clash under Saved Viewpoints ▸ GBIM Clash Map ▸ zone, each with a comment.
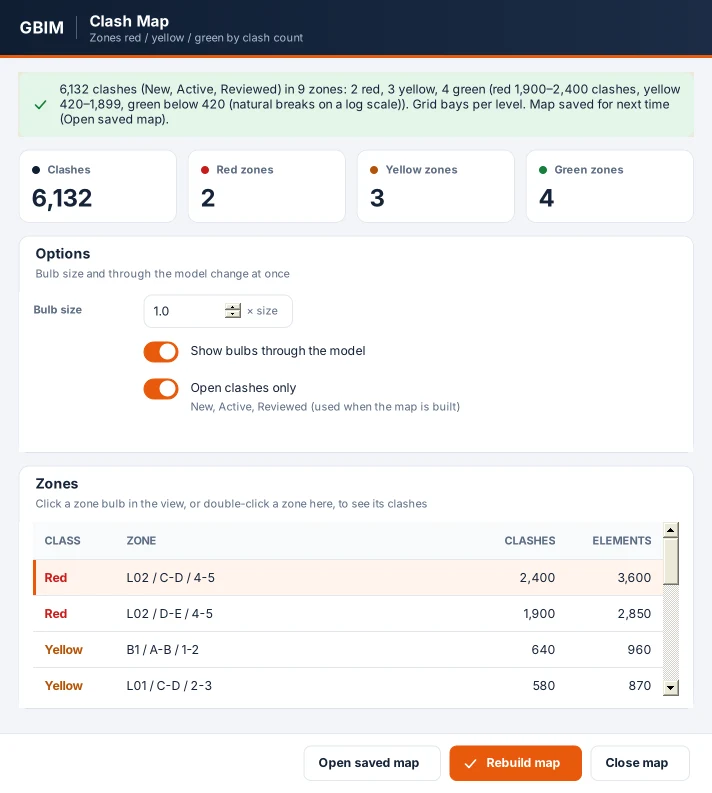
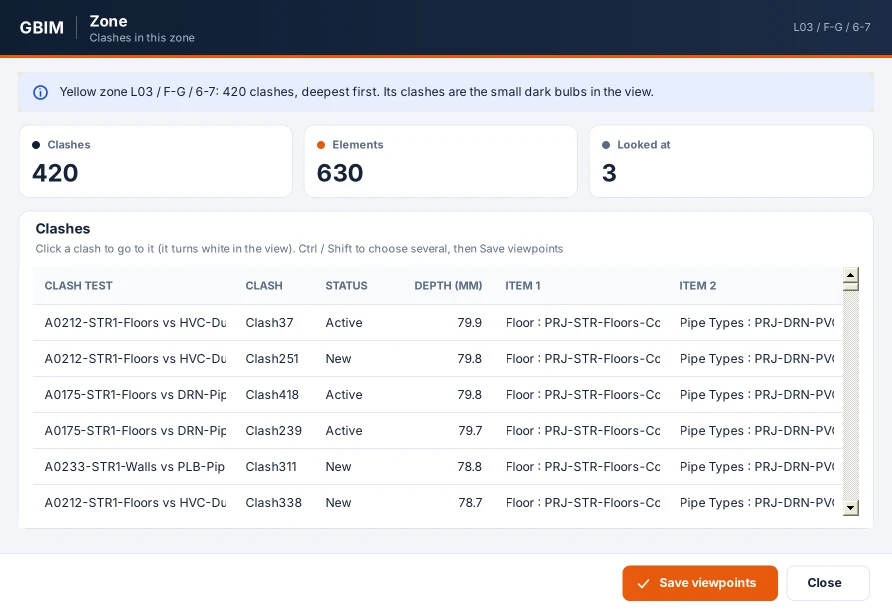
The map is saved with every build. Next time, Open saved map continues where you left off without rescanning; clashes approved or resolved since are hidden. Close map removes the bulbs; nothing is added to the model.
3 · Send response sheets (Clash Report)
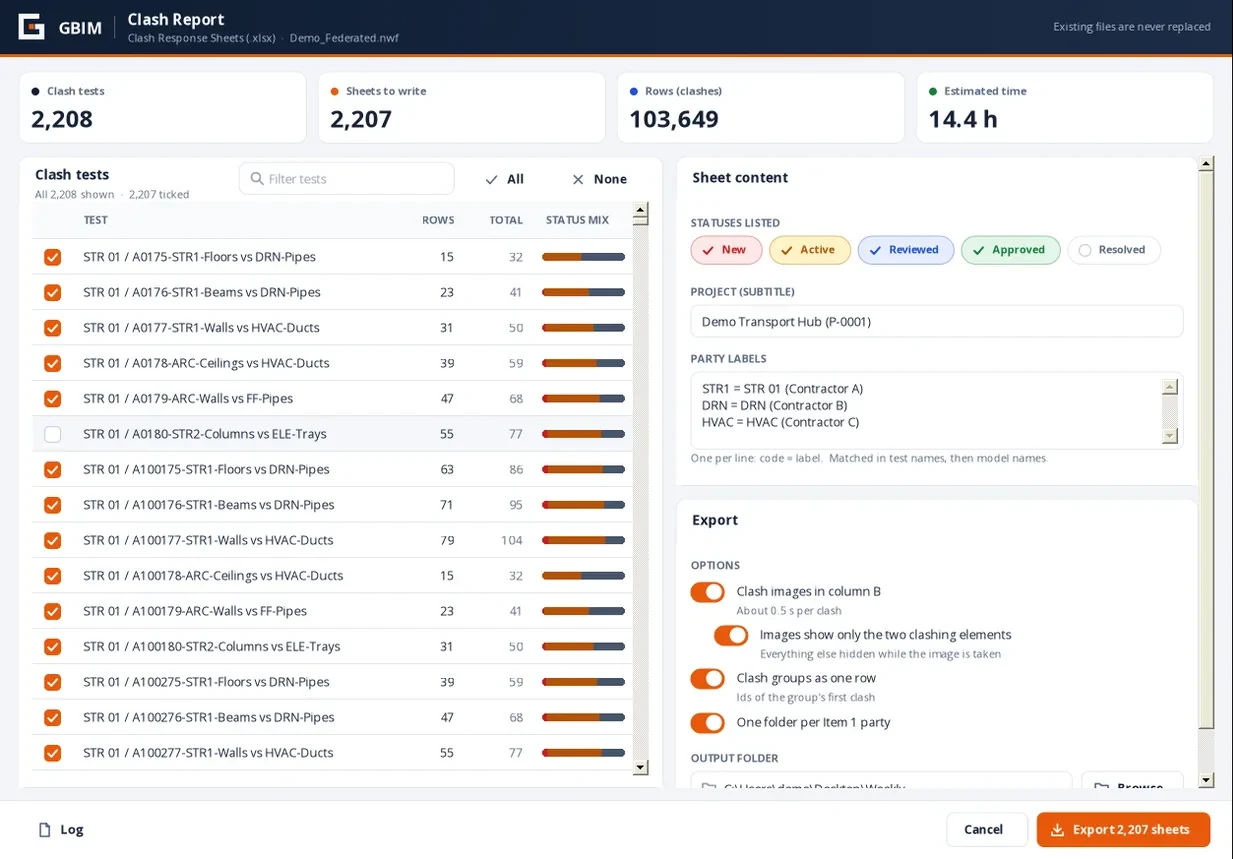
- GBIM ▸ Reporting ▸ Clash Report. Tick the tests. Type words in the filter to find tests in large files; Tick shown acts on the filtered list.
- Statuses: everything except Resolved by default.
- Party labels: one per line, code = label, for example STR1 = STR 01 (Contractor A). The text in brackets becomes the folder name.
- Options: clash images (only the two clashing items shown), clash groups as one row, one folder per Item 1 party.
- Export sheets. Files go to <folder>\Clash_Sheets_<date>\<party>\<test>.xlsx; an existing file is never replaced.
Each sheet has the clash list with images, element IDs and models, the clash distance (overlaps deeper than twice the test tolerance in red), live counters, a status drop-down and a Subcontractor Comment column. Send each party its folder.
4 · Read the answers back (Status Update)
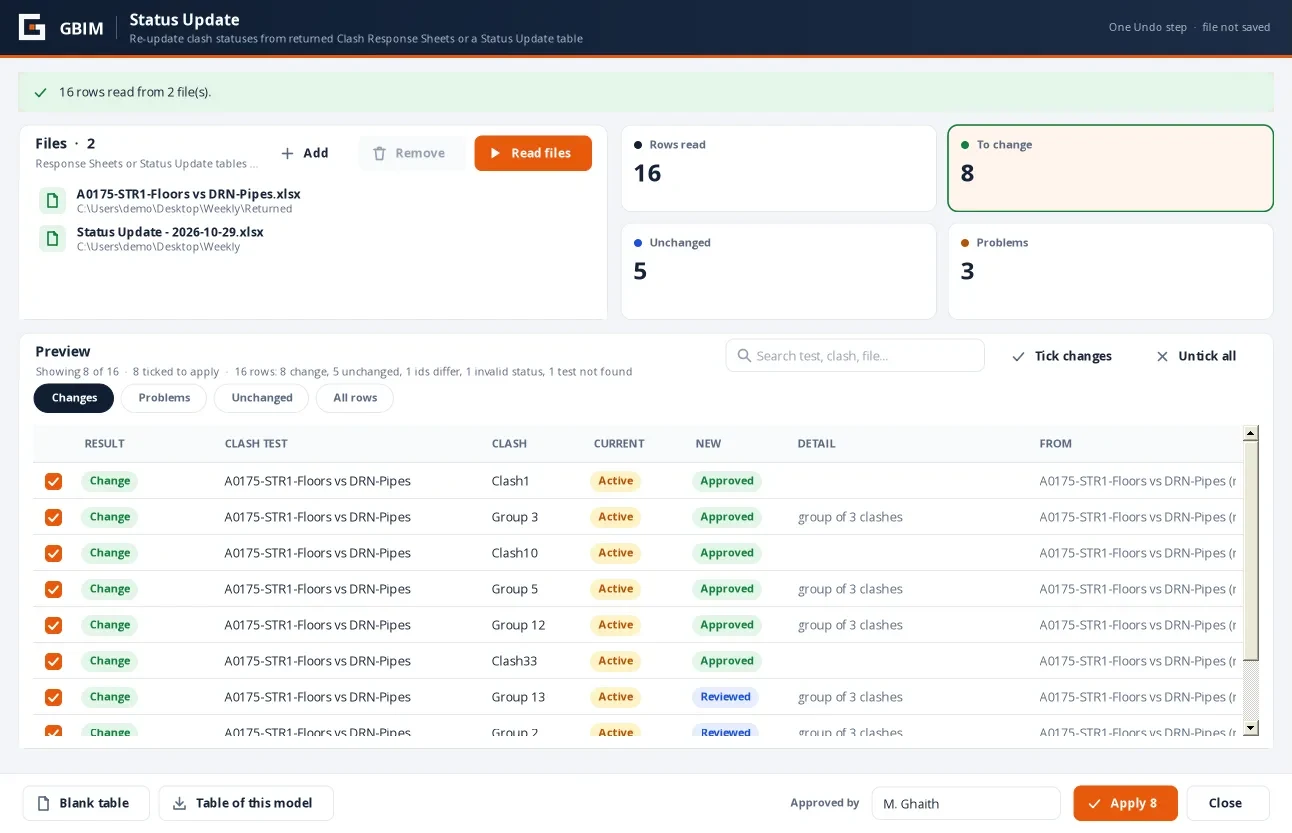
- GBIM ▸ Clash Management ▸ Status Update. Add the returned sheets (several at once is fine) and click Read files.
- Check the preview. Each row is matched by test, clash name and element IDs. Only real changes are ticked; problems (test or clash not found, IDs that differ, a name used twice, conflicting rows) are listed and never applied.
- Apply. The ticked statuses change as one Undo step. Approved also writes Approved By (the name you enter, remembered) and the time.
No returned sheets? Status table of this model… writes one row per clash with the current status; change the New Status column in Excel and read it back.
5 · Fix in Revit
Clash Export and Clash Import
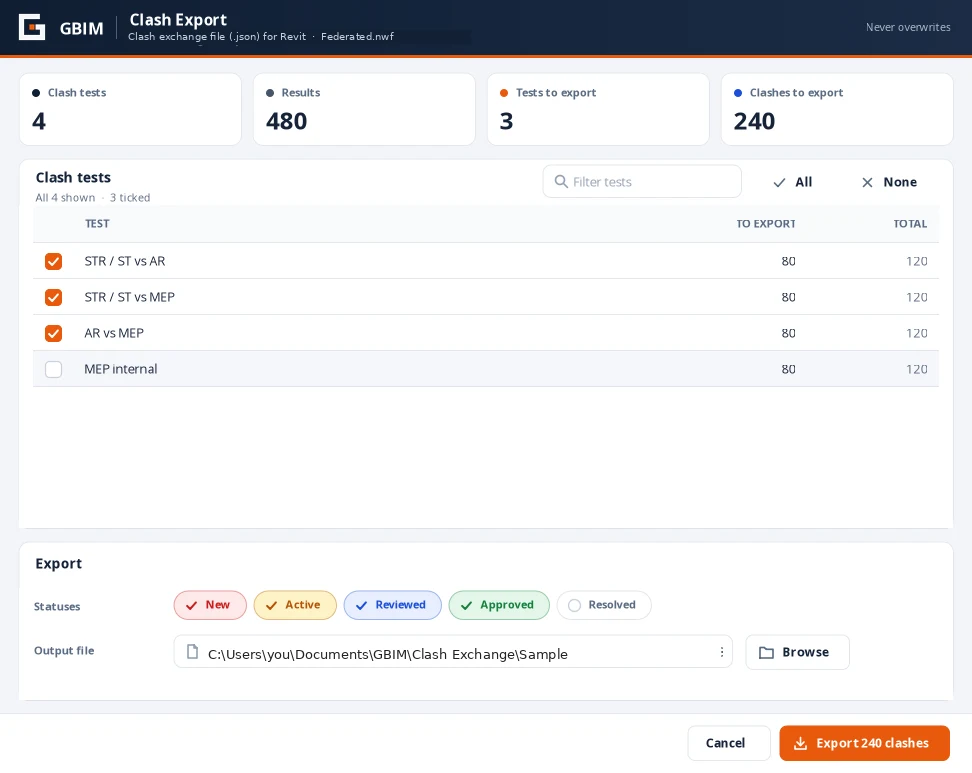
- Navisworks: GBIM ▸ Coordination ▸ Clash Export. Tick tests and statuses, then Export. The file goes to Documents\GBIM\Clash Exchange by default.
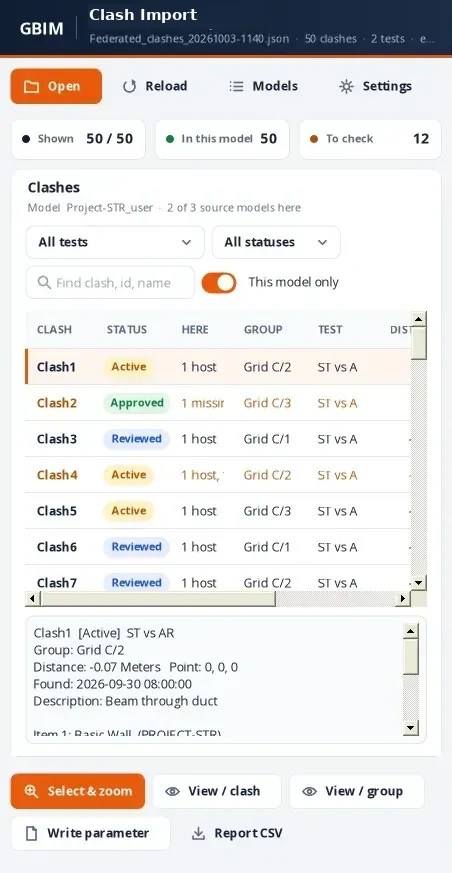
- Revit: GBIM ▸ Coordination ▸ Clash Import ▸ Open… and pick the file. The browser docks beside the view.
- Check Models… Each Navisworks source model is matched by file name to this model or one of its links (local copies and NWC names match automatically). Fix a wrong match once; it is remembered.
- Work through the list. Select clashes (Ctrl+A for all shown), then:
- Select & zoom to see them in the current view;
- 3D view / clash or 3D view / group for isometric views with a section box, host items red and blue;
- Write parameter to put the clash text into the parameter set in Settings (elements with a value are skipped by default);
- Report CSV for how every item matched: Found, Check, Missing, Not loaded, Other model.
A match is marked Check, and never written to, when the category differs between Navisworks and Revit, or only the ElementId matched although the file carries a UniqueId.
Clash Sync
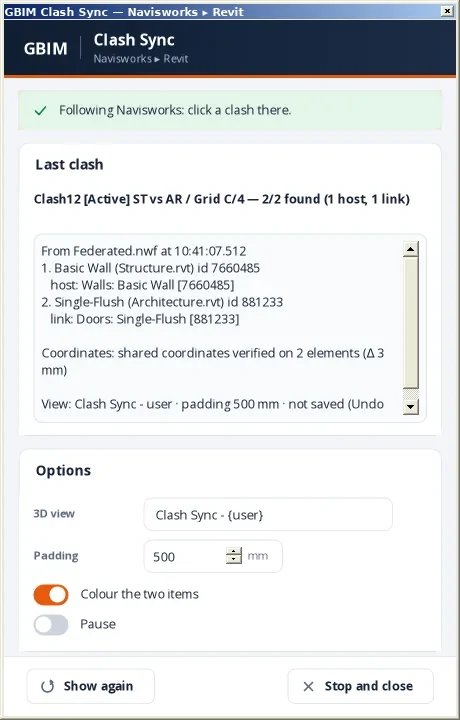
- Navisworks: GBIM ▸ Coordination ▸ Clash Sync (the message says ON; run it again to switch off).
- Revit: GBIM ▸ Coordination ▸ Clash Sync. The window opens at the bottom right.
- Click clashes in Clash Detective. Revit updates one 3D view, Clash Sync - <user>, with a section box, colours and zoom.
Navisworks and Revit must run on the same PC. Coordinates are checked on every clash (shared, inverse or internal); the window says which agreed.
6 · Re-run and close
- Load the updated models and run the tests again. Fixed clashes become Resolved.
- Open the saved map to see whether the red zones have cooled down.
- Approve accepted clashes with Element Clashes or Status Update, then start the next turn of the loop.
Clashes of one element (Element Clashes)
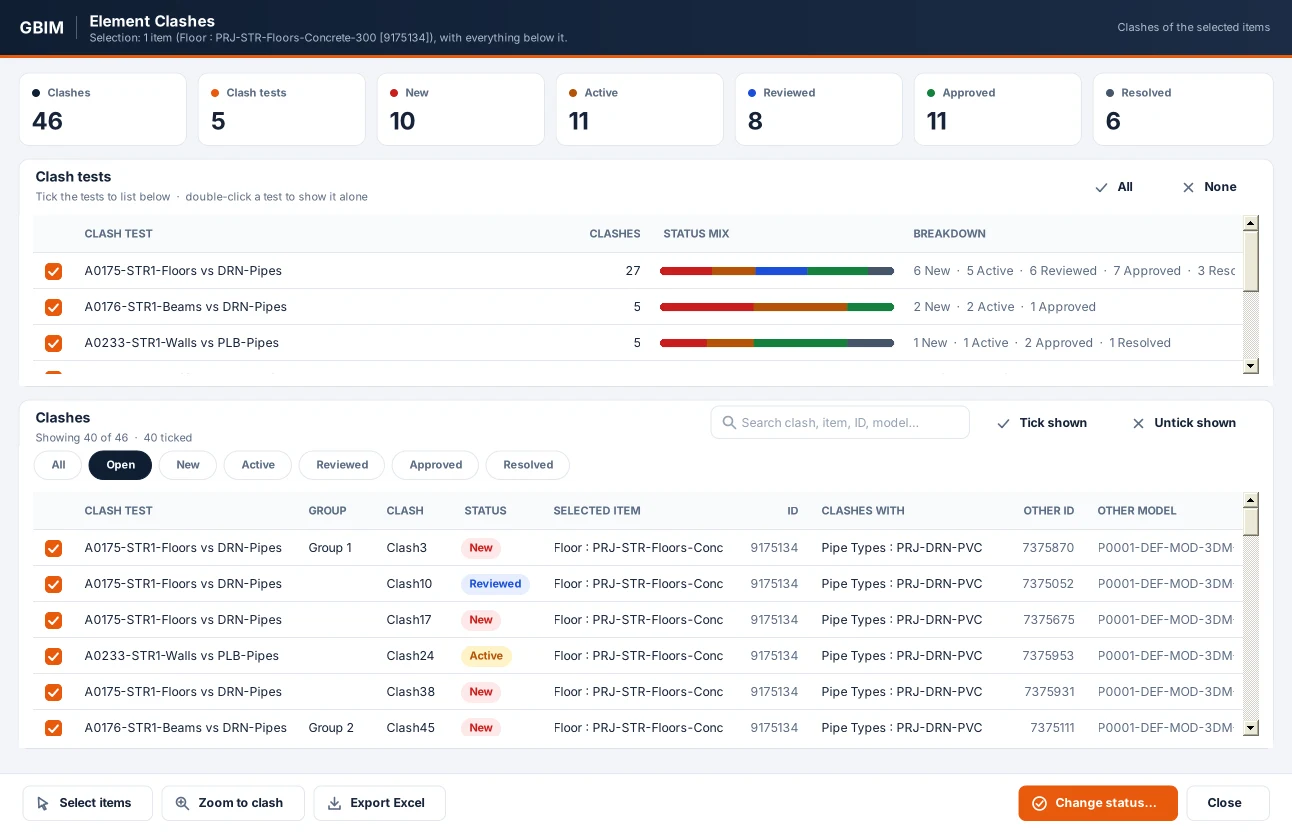
Select one or more items in Navisworks (an element, a layer or a whole model) and click GBIM ▸ Clash Management ▸ Element Clashes. You see, per test, how many clashes the selection has and every clash with the other item, its ID and model. Change status… sets the status of the ticked clashes in every test at once; Zoom to clash uses the clash's own viewpoint.